Gluten Free- Lemon Ricotta Cheesecake

23 Oct

Welcome back to yet ANOTHER fun filled cake adventure (or just my blog). Today I will be discussing the importance of Gluten free baking! I decided to make a Lemon Ricotta cheesecake, but rather than use the Graham cracker crust, I purchased gluten free chocolate biscotti. I ground them up in the food processor and added a little bit of olive oil (NO BUTTER!!!).

The ground up Biscotti (See the chocolate chips?!)


After this, I placed the cream cheese (Reduced fat) and Ricotta (part-skim) into the blender and mixed on Medium for approximately 5 to 10 minutes.

Note: The Kitchen Aid Mixer 🙂


I added the eggs next, one at a time (maintain the emulsion). The batter must come together before added the next one! After this I added the zest and juice of 2 lemons, along with lemon extract, sugar and corn starch. I mixed until nice and smoooooth.

These I bought were HUGE! The recipe called for 4 lemons, but I only needed two.

I poured the batter over the ground biscotti and baked for one 45 minutes. I used one 6 in spring form pan, and a 8 in spring form pan. To add a little bit of a crunch, and since I absolutely LOVE nuts…I made a simple syrup (equal parts sugar and water) and poured it over the almonds. I then baked them in the oven until crispy and crunchy and sweet and OMG I cannot STOP eating these!!!!

Candied almonds...these are addictive!


Nom nom nom nom


After 45 minutes, I took the cakes out of the oven (which is what you do when it’s finished baking haha) and scraped the sides of the spring form pan to prevent cracking!

I love the evenly browned ring on the outside!


After it was cooled, I added the candied almonds on top and sprinkled with powdered sugar!


There you have it folks! Gluten Free Lemon Ricotta cheesecake! Now who gets to eat some?!!! I hope you enjoyed!

THANKS FOR READING MY…lemony goodness…BLOGGERY!

OreOH SO Delicious!!!!

15 Sep

Heya folks! I really have been slacking…but I do want you to know, I am still breathing and am very much alive and well.

School is still going great (check out my facebook for more photos)…we’re now onto Pate Feuillette (AKA Puff Pastry!).

I HAVE A RECIPE!! These OreOH So Delicious’s are really really good. Super easy and fun. I love desserts like these. Im not a huge fan of the fancy shmancy desserts (you know with the pasty cream filling and the delicate wisps of creme anglaise brusedh onto the plate), I like down home, rustic, messy desserts (No utensils allowed, just your fingers for lickin’).

YOU WILL NEED for the OreOH So Delicious:

  • Oreos (You can easily make a home made cookie and cream)
  • Graham cracker crumbs
  • butter (melted)
  • Sugar
  • peanut butter
  • A working oven
  • A Kitchen Aide Stand-Up Mixer for Natale
  • A loving heart
  • A sense of humor
  • Hehehe
OK! First things first you marry the Oreos and peanut butter together…you can use 2 full oreos but I didnt want them sticking out of the muffin pan so I used 1 and a  half. I scooped the Peanut butter from the jar (I’m a little obsessed with peanut butter and chocolate…) and spooned them on top.

You can use 2 Oreos for this but I didnt because then it would be taller than the muffin pan!

MOVING ALONG! I melted the butter (1 stick…Culinary school has taught me well, sorry Papa!) and smashed up my graham crackers. I used both Chocolate and Honey flavored. I like the combination for its taste and color (matches the peanut butter and the chocolate in the cookie).

UBER NOM NOM!!! This was not easy to NOT eat 🙂

I did not use a food processor to crush the graham crackers. The chunky pieces add to the texture of the dessert making it more crunchy. I place the crackers into a bag and smashed it with the smooth side of a meat tenderizer. I added about 2 tablespoons sugar.
Next comes the muffin tin. I sprayed the tray with cooking spray and then lined the muffin tin with the graham crackers. I went up the sides a little bit to surround the stacked cookies. I slapped on some peanut butter on the bottom of the cookies to stick to the graham crackers. I then put the cookies in the tin and filled in the void with the extra crackers.
I put these in a 350 degree oven for….eeeeer…20 minutes? I wanted the peanut butter to melt and get the cream in the cookie melted. When almost dont (about 15 minutes in) I spooned more peanut butter on top.  *** WARNING:You will lose some crackers when removing them from the muffin tin…DONT WORRY stick em back on. Remember the peanut butter on top? ooooh yes we encased those cookies in peanut butter and graham crackers. Let them cool cool cool, or eat them hot…and burn your mouth on gooey peanut butter…oh well.
They will look something like this. You can sprinkle with powdered sugar. A good Sunday morning treat!!!
Difficulty: Easy peasy lemon squeezy
Delicious Scale: OVER THE TOP!!
Diet friendly: NOPE! Not today sweet heart
Good for dessert on Sauce day? I think yes 🙂
THANKS FOR READING MY…Ca-Cake and Pastries: Coming to a Web browser near you…BLOGGERY!

Pastry School thus far!

22 Aug

I promise I did not forget about my lovely blog! I wanted to talk about Pastry school! I did in fact start 3 weeks ago (going on week 4). It is by far the best experience I’ve ever had. It’s fun, informative, hands-on. The 5 hour classes go by in the blink of an eye! My chef instructor is fantastic and my class is also wonderful. I couldn’t have asked for more!

I am doing tarts right now and will be moving on to Puff Pastry . I’ve made thus far:

  1. Tartelettes Aux Fruits Frais 9Fresh Fruit Tartlets)
  2. Tarte A L’Oignon (Rustic Onion Tart)
  3. Tarte Alsacienne (Alsatian Apple Tart)
  4. Tarte Aux Fruits (Fresh Fruit Tart)
  5. Pots De Creme Chocolat (Pot of Cream- Baked custard)
  6. Tarte Bourdelaoue (Pear and Almond Tart)
  7. Tarte Aux Bananes et Creme (Banana Cream Tart)
  8. Tarte Aux Pommes (Apple Tart)
  9. Fig Newtons
  10. Clafoutis Aux Cerises Limousin (Clafoutis Limousin- Style)
  11. Spritskakor (Scandinavian Butter Cookie)
  12. Tarte Au Citron (Lemon Tart)
  13. Tarte Aux Noix (Nut Tart)

I have picture of most of them!

Tarte Aux Noix

Tarte Au Citron

Tarte a L'Oignon


Pots De Creme


Tarte Bourdealoue


Tarte Aux Frutis Frais


Tartelettes Aux Fruits Frais

There will be plenty more to see (and eat!) So I hope you come back and visit me again!

THANKS FOR READING MY…Creme Pastissiere…BLOGGERY!

Brownie alla FamScan!

26 Jul

Well hello and welcome back to my Bloggery!

Trust me I have been baking I’ve just been laaaazy with the blog part haha. SO today I am discussing brownies. And Im not talking plain old brownies, Im talking Brownie Alla Nina! (FamScans = A really cool blog you need to check out). These brownies consist of:

  1. Chocolate
  2. Walnuts
  3. Chocolate
  4. Toasted Coconut
  5. and Chocolate
  6. Oh yeah, chocolate

YUM-YUMI-YUM!!!

Here is le recipe:

  1. 2 cups Whole Wheat Flour
  2. 3/4 cup Olive Oil
  3. 1 cup fine white sugar
  4. 1 egg + one egg yolk
  5. 1 1/2 tablespoon cocoa powder (you can totally melt your own chocolate!)
  6. 1/4 teaspoon baking powder
  7. 1/4 teaspoon salt
  8. cap full of vanilla extract
  9. half cup dark chocolate chips
  10. 1 cup toasted coconut (half cup for the topping)
  11. and, you guessed it, half cup of chopped walnuts
You dont even need the brownie mix you buy in the store…know why? Because you can literally throw all of these ingredients into a large bowl and mix away!  NOT THE WALNUTS AND CHIPS!!! Save it for the topping.
Take the coconut (the whole cup) and place in a pan, you need to watch this…I mean dont move from the stove!!! This can burn fairly easily. Add 1/2 to the ingredients.
I’d start off with the spatula to get the dry ingredients incorporated (avoid the puff of flour) then work with your hand mixer. If you have a stand-up mixer (JEAAAALOUS) mix on low for about 1 minute.
I pre-heated my oven for 350F. Lay in a lightly greased pan.Take the coconut, chocolate chips, and walnuts and press into the brownie (ensure stick-age) and bake for approximately 30 minutes. Always use a toothpick as your guide! Comes out clean? ALL DONE!
Brownies can last you weeks on end…freeze or eat them right out of the oven burning your mouth :).
Do use this recipe. It certainly is a cinch! Definitely big flavor!
Thanks for reading my…WHO WORE IT BEST?!!!…Bloggery!

Peanut Butter Brownies~!

25 Jun

I am obsessed with peanut butter (high cholesterol and all). It’s so versatile…you can literally eat it at EVERY meal!

Breakfast: Peanut Butter Cap’n Crunch with ice cold milk

Snack: Ritz crackers with a teaspon of peanut butter with a slice of Granny Smith Apple

Lunch: Peanut butter and jelly

Snack: Celery with peanut butter

Dinner: (Some chinese dish with peanut sauce) haha

Dessert: Peanut butter brownies! (or chocolate-peanut buttuer cookies, peanut butter cheesecake, frozen peanut butter and bananas, peanut butter ice cream…get the picture?)

Store at room temperature to make it easier to spread

Any who, I LOVE LOVE LOVE LOVE peanut butter 🙂 hahaha…moving along! Today I made Peanut Butter Brownies. I was debating whether or not I wanted to add in chocolate. But peanut butter has such a good flavor on its own, I didn’t want the chocolate to mask it’ sweet taste (well…chocolate and peanut butter is by far the greatest combination EVER!!!! Don’t try and EVEN compare Romeo and Juliet or Adam and Eve, peanut butter and chocolate = win!). But yes, these really are not brownies (I guess they’re blondies?)

In a large bowl, cream together softened butter, brown sugar and white sugar. To make things a little easier, I like to cut my butter into squares.

I used unsalted!

Mix the sugar and butter until nice and fluffy! Once fluffified (heh, I made that up!), add in the eggs. Do this one at a time! Theeeen add the vanilla extract and peanut butter. The batter should look like this! Do you notice the towel underneath my bowl? I’ll ‘splain in a sec! (and no it’s not used to catch the flying mixture…well it could serve that purpose too)

Mix mix mix!

At this point you want to add in the dry ingredients. But when you’re adding that in, keep mixing! If you keep the dish towel there, it’ll prevent the bowl from moving when you’re handling the second bowl. This process would be 5489678975985 times easier if I had a Kitchen Aide Stand-up Mixer, But I work with what I have haha.

Marry the two ingredients!

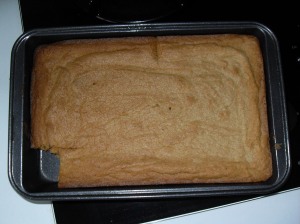
Add the dry ingredients (flour, salt, baking powder) in 2 batches as there isnt a lot of it…and keep mixing until a semi-brownie-ish dough forms. Spoon into a greased pan and cook up for approximately 35 minutes. The recipe called for 350F for 35 minutes, but I felt the oven should have been on 325F because the edges got brown too quickly 😦

Here is the end result….notice the missing piece? (heheheheh)

Yum 🙂

I made these for my Mother’s birthday (Happy Birthday!!!). I would have made her a cake of some sort, but with the frosting it gets messy and since these are for her job, they’re super easy to carry and serve, You only need a napkin!

To make even pieces: Cut the middle of the brownie first and make your way out!

I added in some decorative tooth picks to make it look pretty!

1...2...3!

That’s all for today! Stop by again 🙂

THANKS FOR READING MY…38 days til Culinary School…BLOGGERY!

The French Macaron (No coconut here!)

18 Jun

Hey Everyone!


Welcome to another entry in my Bloggery. Today I have made: French Macarons. Thanks to Miss Lindsey who is traveling through France, she gave me this idea!


I remember watching the “Best Thing I ever Ate” on the Food Network Channel and Wolfgang Puck talking about macarons…me thinking, this french dude is talking about a MACAROON?! Baked cookie with coconut?! Boy…was I WRONG. A Macaron is a french confectionery made with egg whites, sugar, powdered sugar, and almonds. I couldnt believe there was no butter (I was sort of relieved…). So Any who, a Macaron…very good. The cookie itself is very light and full of air and they break easily…haha.


Freshly out of the Oven

The batter does not have flour or butter (!! yey). Instead, it uses ground up almonds (I used slivered almonds and used the food processor to make a powder), confectioners sugar, egg whites beat until nice and fluffy (just like the Rainbow cookies!), and of course more sugar. I guess you can make ant flavored macaron, it all depends on your taste buds (see me…I like chocolate so OOOBVIOUSLY I made chocolate). I used a ganache filling.

You do not want to have lumps in your ground almonds, confectioners sugar, and semi-sweet chocolate powder mixture. I used a sift to get all of the large lumps out. This process takes a few minutes, but is worth it in the end. So yes, beat your egg whites until soft peaks form, add in the sugar slooooowly and add the dry ingredients slooooowly. Fold all of the ingredients together making a nice chocolately looking batter.


Now, in order to make the 1 inch circles, you need a piping bag with a small tip.Imagine using a spoon? UGH mess…

Cook these off for about 15 minutes or so (the house is going to smell yummy!) and let completely cool…as stated earlier, these crack easily. IN THE MEAN TIME!

Make your ganache filling (heavy cream and chocolate)…let it cool in the fridge until ALMOST COLD…you dont want the ganache to get too firm as it will be harder later on to pipe it on the cookie. Keep stirring it in the fridge until at your desired consistency.

After this process, get your new pastry bag with an even smaller tip and pipe on the ganache. I didnt know how to much put exactly…I used my judgement. Dont over flow it, but certainly dont be stingy. Pop a top on it and YOU’RE ALL DONE!


I never made Macarons before, this was my first time and it’s wasnt to bad! I think next time I’ll do a vanilla or lemon or SOMETHING yummy.


TIP: Use Parchment paper on the pan!

yuuuum!


THANKS FOR READING MY…that’s a wrap…BLOGGERY!

7 Lay–eer…6 Layer…Rainbow Cookies!

11 Jun

I like freezing them first so they stay together


Yummy yummy yummy! Rainbow cookies are not too difficult to make. True, it is time consuming, but what only takes time is letting them sit overnight in the refrigerator. But hey! If you start early in the morning, they might be ready by the evening. Or just go to sleep!

This batter requires the eggs to be separated and the whites beat until light aaaand fluffy. This process can take a few minutes. I like to use a large bowl (unless if you have a stand up mixer…Im working on getting that! Then this whole process is a cinch) and turn the mixer in a circular motion. —>You can even make a meringue! You must see nice, “soft peaks!!!! You will know what I mean.

Other than that, the dough has butter (o-course!), flour, egg yolk, sugar and almond paste (OK, now…you have another option: Almond filling. I use the filling…aka pie filling, because who wants to break the paste into pieces with a fork for 20 minutes? Beating the egg whites is a workout in itself). Just beat the ingredients together and FOLD in the egg whites. FOLD IN does NOT mean beat in! You worked OH SO HARD to beat the air into the whites and now you destroy by beating in the whites! Add a small in at a time!


You then have to separate the batter into 3 equal parts (aaaah, mine are never equal! But do your best) and make one green and one red. I normally use  small rectangular aluminum pans for this (WHY ON EARTH would you dirty THREE pans?!!! UGH the clean up!). Grease those babies up, pour in the dough and let it bake for approximately 15 minutes.

The edges will be brown! But the dough will be very moist! DONT WORRY IT’S COOKED THROUGH! 🙂

Remove the pans from the oven, let them cool and slap on some jelly of choice (I use what is ever in the fridge, for instance, the one’s in the photo have Fig jelly and Cherry jelly. Weird combo, eh?). Set the jellied up layers (see below…this isnt the BEST angle of the completed, uncut cookie, but you get the idea) into a pan, put on a piece of aluminum foil, and put a heavy object (try a textbook as it is flat!) and stick it in the fridge for at least 8 hrs.

Hehehe the dough took the shape of the pan!


NEXT DAY! Melt the chocolate (semi-sweet) and pour over and smooth out. When melting the chocolate, I like to add milk or cream to prevent the chocolate from cracking when cut! Put it in the fridge to let the chocolate set, cut, AND SERVE!!! 🙂


EAT MEEEE!!!

Pretty!


As you can see…there are a few steps that need to be taken, but don’t let is scare you! Please give it a try!


Difficulty: Medium

Taste: NOM NOM NOM!

Diet Friendly: Nope!


Thanks for reading my…use a sharp knife to cut…Bloggery!


Why the dog needs her own Peanut Butter

3 Jun

This is not a baking related blog, but food is definitely involved!

As you most of you know we got a dog…a very cute Mini-Pin named Lucky (aka, Phat, Lucky Pants, Pants) and my mother is IN LOVE with her. Which of course is wonderful…however, why does the dog need her own peanut butter? Well, this is certainly news to me!

Here are the blatant reasons WHY Lucky needs her own peanut butter:

  1. To watch and laugh how she eats it
  2. Give as a treat if she has been good
  3. A way for her to take a pill
The chosen jar of said peanut butter was Peanut Butter and Company’s creamy peanut butter….MY peanut butter. When my mother stuck her finger in the jar after feeding it to the dog I was slightly mortified to say the least.  I use that peanut butter…uuuum now I have dog germs. AWESOME!
Thanks Mom
THANKS FOR READING MY…it’s a good thing they labeled the jar” DOG” on the top…BLOGGERY!

The Simpler, most likely the Better

27 May

You really can’t go wrong with the PERFECT chocolate chip cookie!

This recipe does require an oven (soooooorry!) and can be time consuming if you ONLY have 2 cookie sheet pans that can ONLY fit 8 cookies….Hey! If you feel the need to go out and buy multiple pans, be my guest (and let me borrow em’) !

All of the ingredients are added at different stages. All of the wet ingredients (always start with the fat, butter, lard, margarine) and sugar. In this case, it took both brown sugar and white sugar. Cream the 2 together until smooth. Then add your binder: eggs. This recipe called for 1 egg and 1 yolk…add these separately mixing very well in between.

The next step is to add in the vanilla extract. MIX MIX MIX!

In another bowl mix your flour (you may use whole wheat flour!), baking soda, salt and add into the wet ingredients slooooowly. I normally do it in batches…add some dry mix, beat with mixer, and repeat 3 or 4 more times. So when a dough forms add the chocolate chips (this is when you can have your fun! You may add milk chocolate, peanut butter, dark chocolate, white chocolate) and/or nuts (macadamia, walnuts, pecans, hazelnuts). I use my hands to incorporate everything.

This slideshow requires JavaScript.

Use a greased cookie sheet and bake for about 16 minutes (if you have a convection, it’s probably between 12 to 14 minutes, but since mine sucks I need extra cook time).

See? Easy! Baking does not have to be difficult! Just be patient and you’ll get the hang of it! 🙂

DIET FRIENDLY: NO (you can make it though…use whole wheat flour, and use olive oil instead of butter)

DIFFICULTY: Easy

TASTE: 10!

Thanks for reading my…you have to eat AT LEAST one…Bloggery!

The Million Dollar Question! What IS White Chocolate?

27 May

White chocolate is mainly this: sweet. HA! Did you REALLY enjoy that Hershey’s Cookies-n-creme candy bar?

 fail

…Probably not,

Why not call it “This is NOT chocolate, but a vanilla flavored piece of matter containing sugar”? Because White chocolate contains COCOA BUTTER which is created using the by product of chocolate liquor…no not alcohol silly, geez what did you think this blog was about? PSH. The liquor is derived from fermented and pressed cocoa beans.

White chocolate also contains milk solids, vanilla flavorings, and sugar…lots and lots of sugar.

There you have it. Hope that helped! 🙂

Thanks for reading my…Thanks Neen for the idea!!!…Bloggery!